Smoked Paprika and Orange Kale Chips

13 Jun

BeFunky_IMG_3567.jpgThe name says it all actually, no need to write a recipe. Okay I’ll write something. Just to fill out this page.

Kale chips became such a popular snack these days. Or maybe just in NYC? I don’t know. But you should know that they are incredibly quick and easy to make at home. Here is how:


4 cups of kale (the leafy parts, so cut off the stems)

2,5 tablespoons olive oil

1 tablespoon fresh orange zest

1/2 teaspoon smoked paprika

1/8 teaspoon ground cumin (optional)

pinch of salt


Preheat your oven to 350 °F. Prepare your tray with parchment paper or aluminum foil on it.

Cut off the stems of the kale and rip apart in order to make big chunks of the leaves and wash them. Make sure they are completely dry. That way your chips will be crunchy.

BeFunky_IMG_3561.jpg

In a small bowl combine the rest of the ingredients and toss it in the kale. Coat every single chunk with the olive oil mixture.

BeFunky_IMG_3564.jpg

You have to put them as a single layer on the tray. This means it is going to be a few batches you keep putting in the oven and taking out. Bake your first single layer kale batch for 8 minutes. If they’re not crunchy you can put them back in the oven for another minute but you need be careful because they get burnt so easily. Repeat it till you’re done with all of them.

Walnut-Pesto Crusted Salmon

6 Jun

BeFunky_IMG_3715.jpgWalnut-Pesto

3 cups fresh basil leaves

1/2 cup walnuts

2 large garlic cloves

1/3 cup steamed broccoli

1 + 1/2 tablespoon lemon juice

1 + 1/2 tablespoon olive oil

1 tablespoon vinegar (white or champagne)

salt to taste

BeFunky_IMG_3717.jpgPut everything in a food processor and process away! I like it chunky because you can really taste the walnuts when it’s that way but it’s up to you how creamy or chunky you want it to be.

Simply spread about 2 tablespoons of it on your salmon and bake it in a preheated oven at 375 °F for 12 minutes. I served it with sweet potato, roasted red peppers, and steamed broccoli.

Protein Pancakes

30 May

BeFunky_IMG_3693.jpgI looooove pancakes. You know I love pancakes. The whole world knows I love pancakes. I’m constantly trying to find a way to make pancakes that are on the healthier side but one challenge with that is it usually doesn’t taste, look, or feel like pancakes. Well this recipe is actually one of the best when it comes to gluten free pancakes. Of course you can use just regular oat flour if you can tolerate a little bit of gluten.

This was my post workout meal the other day and I highly recommend you make it.

Ingredients

1 scoop (30 g) protein powder (I used banana cream flavored but you can use any kind)

1/3 cup gluten-free oat flour

3 tablespoons coconut flour

1/2 teaspoon baking powder

1 tablespoon unsweetened applesauce

2 egg whites

1/2 cup almond milk

BeFunky_IMG_3697.jpgCombine everything in a bowl, whisking until everything is well combined. Spoon the batter onto a hot pan and cook them as pancakes.

I poured some grape molasses on it, as well as peanut butter and sugar free jelly.

Lemon Layer Cake with Fresh Strawberries

23 May

BeFunky_IMG_3495.jpgI’ve been super slow on posts again and the biggest reason for that is… I am so lazy! Yes I said it. Takes a lot of motivation to write everything down and most of the time I’m procrastinating just like how I did for my essays in college. Some things never change. Here I am with a new post though! So you better get excited. This one is also DELICIOUS and it was so much fun assembling everything. It takes time so be prepared, it ain’t easy coming up with a 6 layer cake I tell ya! It was worth all the trouble though.

Even though I normally try not to eat sugar, full fat dairy, and much gluten; for special occasions I put it all aside and enjoy a cheat treat. I tried using earth balance and almond milk but those were the only changes I could make. So be aware that this is not a clean recipe at all.

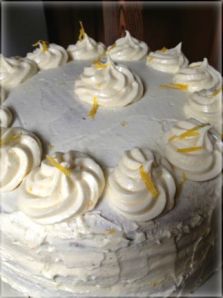
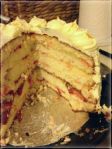
This lemon-strawberry layer cake was Andy’s birthday cake that was eaten for quite some time 🙂  Honestly, it tasted best the day of so I would recommend making it for a big party when a lot of people can enjoy it fresh.

Here is the recipe:

For the cake

2 + 1/3 cups cake flour

2 + 3/4 teaspoon baking powder

1/4 teaspoon salt

1 + 3/4 cups sugar

2 tablespoons grated lemon zest

3/4 cup unsalted butter, softened at room temperature (I used earth balance)

1 cup milk (I used almond milk)

5 large egg whites, at room temperature (equals to about 1/2 cup)

1/4 teaspoon cream of tartar

For the filling 

Egg-less Lemon Curd

2 teaspoons lemon zest

3/4 cup sugar

3/4 cup fresh lemon juice

8 tablespoons unsalted butter (earth balance)

2 tablespoons corn starch

1/2 cup evaporated milk

For the frosting:

1 cup unsalted butter, softened at room temperature (earth balance)

2 tablespoons lemon zest

5 cups confectioners sugar

3 tablespoon fresh lemon juice

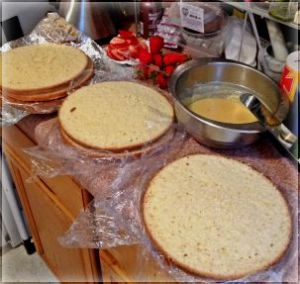
* This recipe gives 2 pans of cake which then turns into 4 layers of cake. I baked a batch first and then baked half a batch in order to have 6 layers. You can totally bake only one batch and have a 4 layer cake.

The cake:

Heat the oven to 350 °F. Butter and flour two 8×2 inch round cake pans. Sift the cake flour, baking powder, and salt together into a medium bowl. Pulse 1/4 cup of the sugar with the lemon zest in a food processor until well combined.

BeFunky_IMG_3488.jpgIn a large bowl, beat the butter and lemon sugar on medium speed until light and fluffy. Add the remaining sugar and beat until smooth. Beat in a quarter of the milk just until blended. On low speed, add the flour mixture alternately with the milk in three batches, scraping the bowl with a rubber spatula; beat just until blended.

In another bowl beat the egg whites on medium speed just until foamy. Add the cream of tartar, increase the speed to medium high, and beat just until the whites form stiff peaks when the beaters are lifted. Add a quarter of the whites to the batter and gently fold them in with a rubber spatula; continue to gently fold in the whites, a quarter at a time, being careful not to deflate the mixture.

Divide the batter evenly between the two prepared pans. Bake for 40 minutes or until a pick inserted in the center comes out clean. Let it cool in the pans for 10 minutes. Take them out of the pans and let cool completely.

With the palm of one hand pressed on top of a cake layer, cut each in half horizontally, using a long serrated knife.

The curd:

Place the lemon zest on a cutting board with 2 tablespoons of the sugar on top of it. Cut the zest and sugar together with a knife; chopping and rubbing the mixture with the flat side of the knife.

In a small saucepan, combine the zest and sugar paste, remaining sugar, lemon juice, butter, and corn starch. Bring to a boil over medium heat, whisking continuously. After 4-5 minutes, reduce the heat to medium low and simmer for 2-3 minutes making sure the corn starch is dissolved. Pour the mixture into a heat proof bowl, whisk in the evaporated milk and let it cool at room temperature. Cover and refrigerate for at least 2 hours but preferably overnight.

BeFunky_IMG_3490.jpg

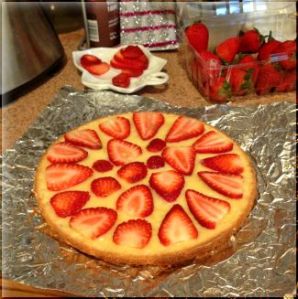
Assemble your cake!!! This is when you bring out the fresh strawberries! Put a layer of cake on a serving plate, with an offset spatula spread some of the lemon curd, and add slices of fresh strawberries on top.

BeFunky_IMG_3491.jpg

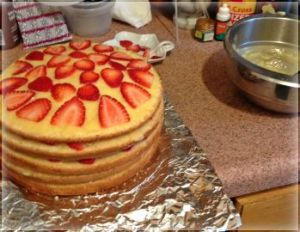
Lay another cake layer on top and repeat until you use all the cake layers.

BeFunky_IMG_3492.jpg

Crumb coat your cake. Spread a thin layer of the frosting on the cake, filling in any gaps as you go. Chill until the frosting is firm. Then spread the remaining frosting decoratively over the top and the sides of the cake. Garnish it with lemon zest.

BeFunky_IMG_3505.jpg

BeFunky_IMG_3509.jpg

I will also put the recipe up for the sangria on another post. It was a blend of fresh fruit and molasses with merlot and orange juice.

I wish I took a prettier picture of the cake when it was cut but this is the only one I have.

Nailed It!

4 Apr

IMG_2558I don’t think it’d be fair to show you only the good things I make in the kitchen. As you know I LOVE searching recipes online and trying them. They usually turn out good. Some great, some acceptable; but this one was a first, it was an absolute disaster. I don’t know what I did wrong, probably a wrong ingredient (I’m suspicious of the “Coconut Cream Concentrate” I used) but everything just fell apart. Actually no, they were never together anyway. The chocolate cake was good, I ended up eating that part the rest of the week but there wasn’t any “cream” with some density to be rolled inside the cake. If you are brave and want to give it a try, here is the link to the recipe: http://balancedplatter.com/coconut-cream-roulade/

I follow the Spunky Coconut ( http://www.thespunkycoconut.com/) and there are many many great recipes. I’ve tried them and loved them, but this particular one did not work. So it proudly goes to my “Nailed It!” folder.

Bacon, Egg and Cheese Oatmeal

28 Mar

BeFunky_IMG_2647.jpgYes, people yes! There IS another way to make oatmeal! Maybe I’m way too late to figure this out but savory oatmeal is totally a thing. After eating oatmeal sweet for years and years I finally realized I can turn it into a breakfast bowl. A little research on the internet machine proved that people do make savory oatmeal and I was not the inventor of it (which was disappointing) and gave me lots of ideas. This is the first of the many experiments. I say give it a try even if you’re not the biggest fan of oatmeal; it might change your mind 😉


Ingredients

1 egg

1 slice of turkey bacon (chopped)

3 tablespoons of pepper jack cheese (shredded or cut in small cubes)

1/2 cup old fashioned oatmeal

3/4 cup water


Note: As you can see this is just an individual portion. Of course you can multiple the recipe.


In a small saucepan crisp the turkey bacon and then set aside. Using the same saucepan cook the oatmeal with water. While that’s bubbling, cook your egg in another pan however you want. I love over easy eggs so that’s how I made mine, you can also make it sunny side up, poached, or scrambled. Once all the water is gone and oatmeal is soft and cooked; add pepper jack cheese and bacon stirring it constantly. Pour it in a bowl and add the egg on top. Yum!

BeFunky_IMG_2651.jpg


Baked Pumpkin Pie Spice Donuts

21 Mar

BeFunky_IMG_2567.jpgSo this is one of those recipes I found online, tried, and realized its a masterpiece I should be making every week. Regular donuts are packed with sugar and they’re fried; literally everything that’s bad for you. Baked donuts are more like little cakes, they’re not packed with sugar and they are not that bad for you. I follow the recipe on this link: http://tastykitchen.com/recipes/breads/baked-spice-doughnuts/  and let me tell you they come out incredible every time. If you’ve never seen a donut pan, this is what it looks like:BeFunky_IMG_2843.jpg


Definitely get one, it’s so much easier to make donuts with it. I’m considering getting a mini donut pan. Yes, yes they also have mini donut pans which are super cute. Make sure you grease them before pouring the batter and you’re golden. I am copy pasting the recipe on the link above just in case you’re lazy and don’t feel like going to another website to look at the recipe. Just know that all the credit goes to whoever posted this recipe on Tasty Kitchen 🙂


Ingredients

  • 1 cup All-purpose Flour
  • 1 teaspoon Baking Powder
  • ¼ teaspoons Baking Soda
  • ½ teaspoons Salt
  • ⅓ cups Granulated Sugar
  • 1-½ teaspoon Pumpkin Pie Spice
  • 2 Tablespoons Cold Unsalted Butter, Sliced
  • 1 whole Egg, Gently Beaten
  • ¼ cups Plain Yogurt
  • ¼ cups Scalded Milk
  • Powdered Sugar (for Sprinkling)

Quick note: Instead of just powdered sugar I used powdered sugar mixed with pumpkin pie spice. It gives it a great kick!


Preheat the oven to 350F.

In a large bowl, mix together the dry ingredients (flour, baking powder, baking soda, salt, sugar and pumpkin pie spice). Now, cut in the cold butter, working with your hands to incorporate everything until the mixture feels like sand.

Pour in the egg, yogurt and milk and stir to combine. Be careful not to over-mix!

Pipe into a doughnut pan and bake for fifteen minutes, or until springy.

Once out of the oven, sift powdered sugar over the tops and enjoy.

BeFunky_IMG_2567.jpg


Cauliflower Fried Rice

14 Mar

Since I’m obsessed with making lots of grain based recipes with cauliflower now, you have to read a lot of “weird” cauliflower recipes. Just remember that not only it’s good for you, it’s super delicious too!


BeFunky_IMG_1936Ingredients

4 cups of cauliflower rice

1 cup sliced green peppers

1/2 cup shredded carrots

1/3 cup chopped roasted red peppers

1 cup of chopped onion

1 tablespoon minced garlic

2 eggs

3 slices of turkey bacon, chopped

2 tablespoons low sodium soy sauce

Olive oil

Salt and pepper


Start by cooking the chopped turkey bacon over a little bit of olive oil in a big wok. Once crispy, take them out in a bowl. With the same oil/grease scramble your eggs. When they’re done out them in the same bowl with the bacon.

Add about 2 tablespoons of olive oil into the wok. Sautee onions and garlic in the oil with salt and pepper. Add the green peppers and carrots, let them blend in before you add the cauliflower. You’ll see it’s important to have a big wok because it gets pretty hard to stir the whole thing since there is so much of it. Add the soy sauce and right after it gives the color to your rice; pour in the roasted red peppers, scrambled eggs, and bacon. You should add more salt and pepper at this point and keep stirring occasionally to make sure everything is blended nicely.

This is one of my favorite dishes to make now. I don’t feel guilty after eating it; its not greasy, or high in carbs. You can omit the eggs and make it paleo as well. Oh how exciting 🙂

BeFunky_IMG_1941


Cauliflower Crust Pizza

7 Mar

BeFunky_IMG_1862

By far the best thing we made with Callie! You see cauliflower crusts on every healthy website now so we decided it was time to give it a try because we were stuck at home during Sandy. Good news; its easier than you think! Sad news; it took me about 4 months to share it with all of you, oops!


Ingredients

4 cups cauliflower rice

1 cup shredded cheese

1 egg

A blend of salt, pepper, oregano, and any spice you want


In order to make the cauliflower rice you need a food processor. It’s better if it’s a big one because it would take you two batches but even if it’s a BeFunky_IMG_1860small one don’t be intimidated. After washing your cauliflower cut it in junks so it’s easier to place them in the food processor. Process them until there aren’t any chunks left, it will look like rice; really tiny pieces. Boil a big pan of water and place the cauliflower rice in it, let it get soft; it takes about 5 minutes. Drain into a strainer. Then put it all in a cheese cloth and squeeze until there isn’t any liquid left. That way the crust wont get saggy. Mix the ball of rice that looks like a big dough now with the cheese, egg, and all the spices. Now it will actually be a pizza dough! Press it into the shape you want on a tray with parchment paper on it, about 1/3” thick and bake it at 400 °F for 35 minutes.

BeFunky_IMG_1859Take it out and go crazy. Any pizza topping you want will be amazing I’m telling you! We didn’t have pizza sauce at home so I made it from tomato paste, real tomatoes, olive oil, garlic, oregano, paprika, and water. Also since we had a vegetarian in the house we made it a veggie pizza. It. Turned. Out. Amazing.BeFunky_IMG_1861


Cake Balls

28 Feb

BeFunky_IMG_2390I know I know I know it’s been 2 months and I haven’t posted anything. My parents’ friends are already disappointed in me. I know you’ve been waiting patiently for a new recipe every week and it didn’t come, who knows maybe you killed yourself because of it already. I’m sorry if I made you commit suicide. I know it’s hard to live without my recipes. But lets not talk about my laziness anymore and let’s talk about cake balls!

I love cake. It’s the best thing in the world but guess what? Everyone on pinterest has a point, there is one thing that’s better than cake; Cake Balls! Ok I don’t think I can write cake balls! without an exclamation point after it. Making them takes a little longer than just cake. By a little I mean about a day longer. Well maybe not that much, it’s all up to you. The reason it takes long is because you need some time to let the cake balls get firm in the fridge or the freezer before you coat them with chocolate. So it depends on how fast you can make balls and how long you want to let them get firm. If you’re like and you eat a ball or two (or ten) while making them it might take you even longer.

I didn’t bake the cake from scratch. It was a mix I got a while ago. A ‘date bread’ mix. You can also use any cake or bread mix you got. I followed the instructions on the box but also added candied orange peels (cut in really small cubes) and red food coloring cause I wanted them to look pink when you bite into them through the chocolate. BeFunky_IMG_2379

Once the cake was baked I let it cool before crumbling the whole thing. Then I mixed the crumbs with half a container of cream cheese frosting. I hope Callie decides not to read this one; she hates cream cheese frosting although she looked pretty happy with them when she was eating. Probably because I didn’t tell her what was exactly in it! Some recipes use the whole container but you really don’t need to; all you need is to turn the crumbs into a dough that will be just sticky enough to form balls.BeFunky_IMG_2382

You put all the balls in the fridge overnight if you have the time, if not freezer is a great option. Just make sure they will keep their shape when dipped into a hot melted chocolate. Which brings me to the next step; melting the chocolate. I used 72% dark chocolate, it complemented the very sweet cake perfectly so I recommend using the darkest chocolate you have! I melted the chocolate in a medal bowl over boiling water on the stove. BeFunky_IMG_2383

Take the cake balls out of the fridge three at a time and cover them with the melted chocolate. Use a fork to gently take the balls out (without pricking them!) and then get rid of the excess chocolate by dabbing the fork to one side of the bowl. Put them in the fridge again so it will get harden. You can decorate them however you want. I made some colorful granulated sugar by just adding a teeny bit of food color. You can use sprinkles, coconut flakes, nuts, anything you want!BeFunky_IMG_2390